It’s a beautiful day

Hello Crafty Friends!

Today is beautiful day to have a beautiful day! It’s also a great day to share a card I created using this beautiful magnolia wreath digital image by Angie Blom Digital Designs. It’s perfect to create some happy mail to send to a friend!

I started off using up some of my green cardstock as my base and then matted a piece of light pink cardstock on tip which I cut down 1/4 inch smaller.

Of course I had to bring out the patterned paper. This is really old Stampin Up! paper that I had tucked away in my stash. I thought it would work perfectly with the colors I chose.

I printed the image on Hammermill cardstock and then used a stitched die cut to cut out the image. I loosely watercolored the image and splattered a bit of white paint onto the leaves/flowers. I’m addicted to splatters! It gets everywhere but it’s so much fun

I printed the sentiment onto white cardstock and matted it with a scrap piece of pink cardstock. Using foam tape I adhered the sentiment onto my card as shown A few pink gems were added as accent.

This card came together rather quickly and I really enjoyed watercoloring the image. This will be sure to brighten someone’s day!

Thanks for stopping by and have an INKredible day!

You have a big heart

Hello Crafty Friends!

Today I’m here to inkspire you to create something for Love Day! I call it “love day” as opposed to Valentine’s Day because, let’s face it, not everyone likes Cupid. He’s missed his mark a few times in my life, so I can totally relate. I like celebrating LOVE so that’s what I do.

Today I’m sharing a LOVE day card using a digital kit by Angie Blom Digital Designs. This kit is perfect for quick and easy cards.

For this card, I simply printed the image on Hammerhill cardstock and loosely watercolored it with my watercolor pans from Amazon. Nothing fancy. I cut out the image using a scalloped die and matted this onto colored cardstock.

The base of my cardstock is a gorgeous pink that really brings out the bright and beautiful colors in this patterned paper. Oh do I LOVE patterned paper! After gluing it all together I added a grosgrain ribbon for a little accent at the top of the card and a few purple gems as well.

This kit would work not only for love day but as a Thank You card as well!

Thank you for stopping by today and have an INKredible day!

Get Well Soon

Hi Friends!

Today I’m sharing another beautiful digital image from Angie Blom’s Digital Designs called “Smiles Despite The Miles“. It’s a digital kit that comes with three gorgeous images that you can use for any occasion.

For this project I decided to make create a Get Well Soon Card

I started off with a yellow card stock base and trimmed my yellow patterned paper 1/4 inch smaller as my mat. I also cut a piece of coordinating patterned paper as well to break up the design a bit.

I printed out the image on Accent smooth cardstock and used my Scan & Cut to cut out the image

Prismacolor markers were used to color in the image.

The sentiment was created using Word. I created a whole sheet of sentiments to use for various cards/occasions

I tucked the sentiment inside the envelope by using a razor knife to create a slit

The image was popped up from the card with foam adhesive and a jeweled dot and ribbon were used as accents

There you have it!

Have an inkredible day!

Let it Bee

Hi Friends!

Today I’m sharing a bee-utiful card from Angie Blom Digital Designs which is also part of the recent new release!

I started off with a colored card stock base and then cut my patterned paper 1/4 inch smaller.

I printed the image out on Accent supersmooth cardstock and cut out the image using a scalloped rectangle die cut.

I used my Spectrum Noir markers to color the image and added some gold splatters using metallic watercolor paint

What’s a bee-utiful bee without a bit of sparkle? if you look close you can see the glimmer on the wings! I found some pretty holographic embossing power so I added that for some shimmer!

A few Nuvo drops for accent and of course a bright yellow ribbon to match!

The image was adhered to the base with foam adhesive

And there you have it!

Have an inkredible day!

Happy Birthday Guy!

Hi Friends!

There’s a new release today over at Angie Blom Digital Designs! You are going to definitely want to add this to your collection!

I created this card by starting out with a colored cardstock base and then cutting my patterned paper 1/4 inch smaller

The image was printed on Accent super smooth paper and then cut out using my Scan & Cut.

I used Copic markers to add color

The sentiment was also printed on super smooth paper and trimmed to size

Both my image and sentiment were popped up using foam adhesive

A few rhinestones to accent

And there you have it!

Have an inkredible day!

Sending you a little luck

Hi Friends!

I’m not Irish but I do love those sweet Irish potatoes! Ham and cabbage isn’t all that bad either, wouldnt you agree?

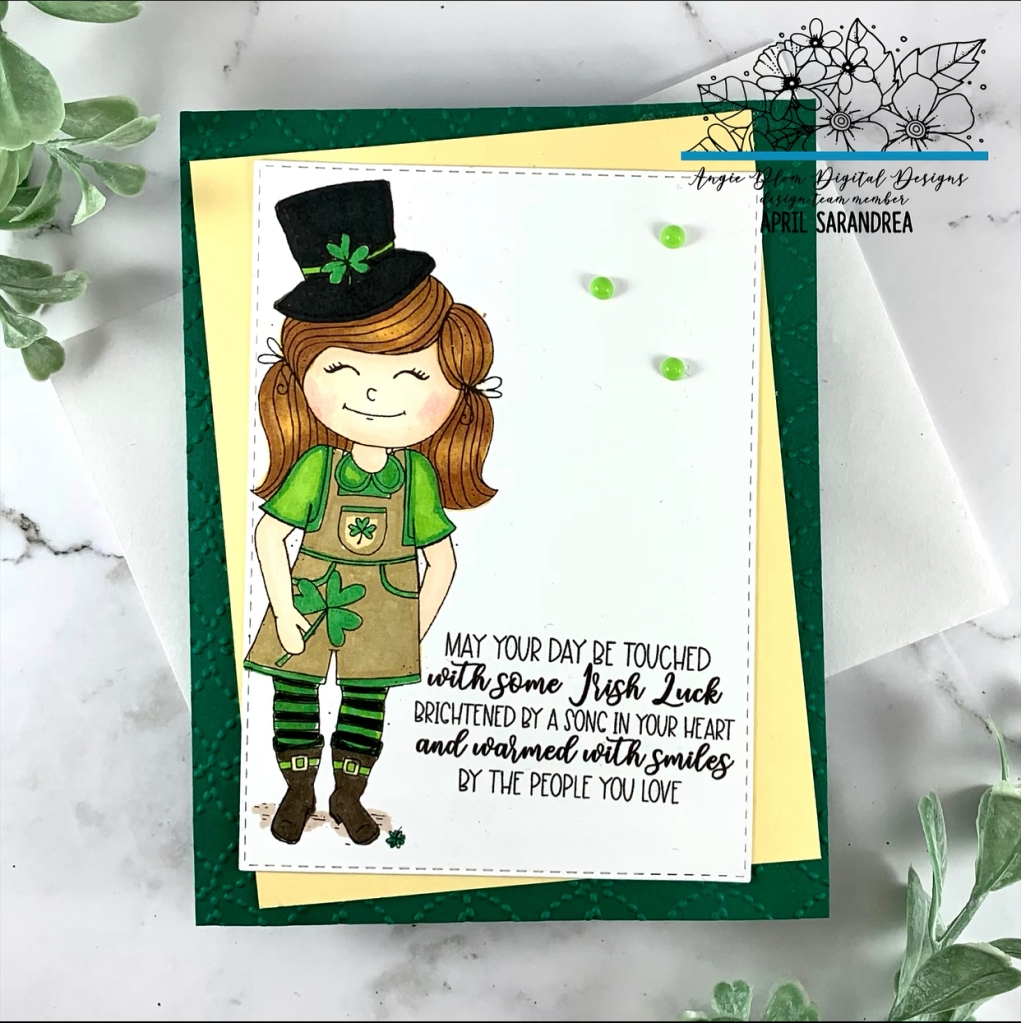
Today I’m sharing a little Irish with you using a digital image called “Lucky Charm Girl” from Angie Blom’s Digital Designs. Isn’t she just the cutest?

I started off with a green cardstock base and ran the cardstock through my Big Shot using an embossing folder to give it some texture.

I then printed the image on Accent Super Smooth Cardstock and cut out the image using a stitched rectangle die.

I measured my cut out image and then cut another piece of yellow cardstock 1/3 of an inch larger to use as my mat (as seen below)

I proceeded to color the gal in with Spectrum Noir markers.

A few Nuvo drops were added as accents

And there you have it!

Have an inkredible day!

Lucky Charm Gal

Dragonfly & Gelli Plate

Hi Friends!
Today I’m sharing a new release from Angie Blom a digital Design. Who doesn’t love dragonflies?! This image with its scripted background is gorgeous

I paired the image with a Gel plate background that I had originally put in my “trash” pile. I’m so glad I saved it!

Have you tried the Gelli plate? It is SO much fun and each pull yields a different result. The backgrounds you make are truly endless.
All I did for this card was print the image and run it through my Big Shot with a laced circle die. I spinged the edges with ixide ink

My mat id the gelli plate pull I had on hand which I wonkily adhered to my black cardstock base

My image was adhered with foam tape for dimension and a few jewels to accent

And there you have it!
Have an inkredible day!

You light up my life!

Hi Friends!

I struggle with masculine cards but when I saw this image from the “camping adventures “ kit by Angie Blom Digital Designs it sparked an idea!

I made this card for my teen for Valentine’s Day , although it would serve for other occasions as well!

i started off with a gray cardstock base and cut the patterned paper 1/4 inches smaller as my mat.

The image was printed on Accent cardstock and colored with Spectrum Noir markers. I used my Scan & cut to cut out the image.

A rectangle die was used to create the background for my lantern and a few fireflies were added as accents (fireflies are from Stampin’ Up!)

I printed my own sentiment in Word

I thought it was the perfect for a teen! Not too cutesy.

Have an Inkredible day!

Cookin’ Up Sass

Hi Friends!

I don’t know about you, but I don’t like to cook HOWEVER cookin’ up a ‘lil sass is something I can (and love) to do!

This kit from Angie Blom Digital Designs is perfect for whippin’ up a cute card! It comes with some funny sentiments and this kitchen scene is just adorable ( and much cleaner than my kitchen right now!)

I started off with a black cardstock base and then I cut my light pink mat 1/4 inch smaller.

You may need to zoom in a bit but if you look closely you will see that I ran my mat through my Big Shot using a brick embossing folder. I just love embossing folders for adding texture!

The kitchen was printed on Accent smooth cardstock, cut with a rectangle stitched die and colored with Spectrum Noir Markers

Once colored, I glued the image to my mat (as shown)

My sassy gal was also printed on Accent smooth cardstock and colored. She was cut out using my Scan & Cut and popped up with foam tape. I made her slightly larger than my background which is one of the many things I love about digis- you can alter them!

I printed the sentiment and cut it out using a stitched rectangle die and popped it up using foam tape as well!

And there you have it!

Have an inkredible day!

You Are Loved

Good Morning!

Today I’m sharing a card I made for Valentine’s Day but, honestly, it could be used for any occasion right? It’s always nice to remind people that they are loved!

This background image from Angie Blom Digital Designs is really awesome! I had so much fun coloring the hearts.

I used a red Cardstock cardnmbase and printed out my image 1/4 inches smaller.

The hearts were colored using my alcohol markers in various shades of red and pink.

The sentiment was printed on Accent paper and die cut. I put a very light wash of color over the wording

Before popping the sentiment onto my card with foam tape, i tied a coordinating ribbon around the card as shown

A couple gems were added to accent

Have an inkredible day!

Angie Blom Digital Designs