

Hellllooo my crafty friends! I sure hope everyone had a wonderful winter holiday season and is excited for the New Year to begin! I know I am INKredibly excited for this year’s line up as a Friends of Unity Team Member! We have SO many fun themes scheduled for this upcoming year for you!
We are starting off the year with “ Laughter, Giggles and Smiles”. What a perfect theme to begin with, don’t you agree? Before I share my projects with you I’d like to personally thank Crystal Minkler for her dedication and hard work in keeping the FOU Hop running so smoothly but also for keeping all of our Team organized! It’s no easy task and her hard work is so greatly appreciated! Thank you Crystal for spearheading another amazing year of creativity for us all!
I also want to thank the beautiful creatives who are part of this amazing team that inspire me to continue to create and who are genuinely supportive humans. I’m so honored to be amongst them each month as we share our love of papercrafting. Please be sure to show each one of my team members lots of love as you hop a long with us ! We so greatly appreciate your support and kind comments.
And lastly, but certainly not least, a huge thank you to Unity Stamp Co who supports our love of their company by allowing us to showcase their amazing products each month. I appreciate not just the company and products but the tight-knit community they have built which has brought so many new friends into my life. Thank You!
Thank YOU for visiting my blog today! Without YOU , I personally would be uninspired to create or share my projects. YOU are the most appreciated of them all! Thank YOU for your unwavering support and encouragement as we create another INKredible year together!
If you’ve gotten this far you’re about ready for some INKspiration now! So, with the Laughter. Giggles, and Smiles Theme in mind, lets begin!
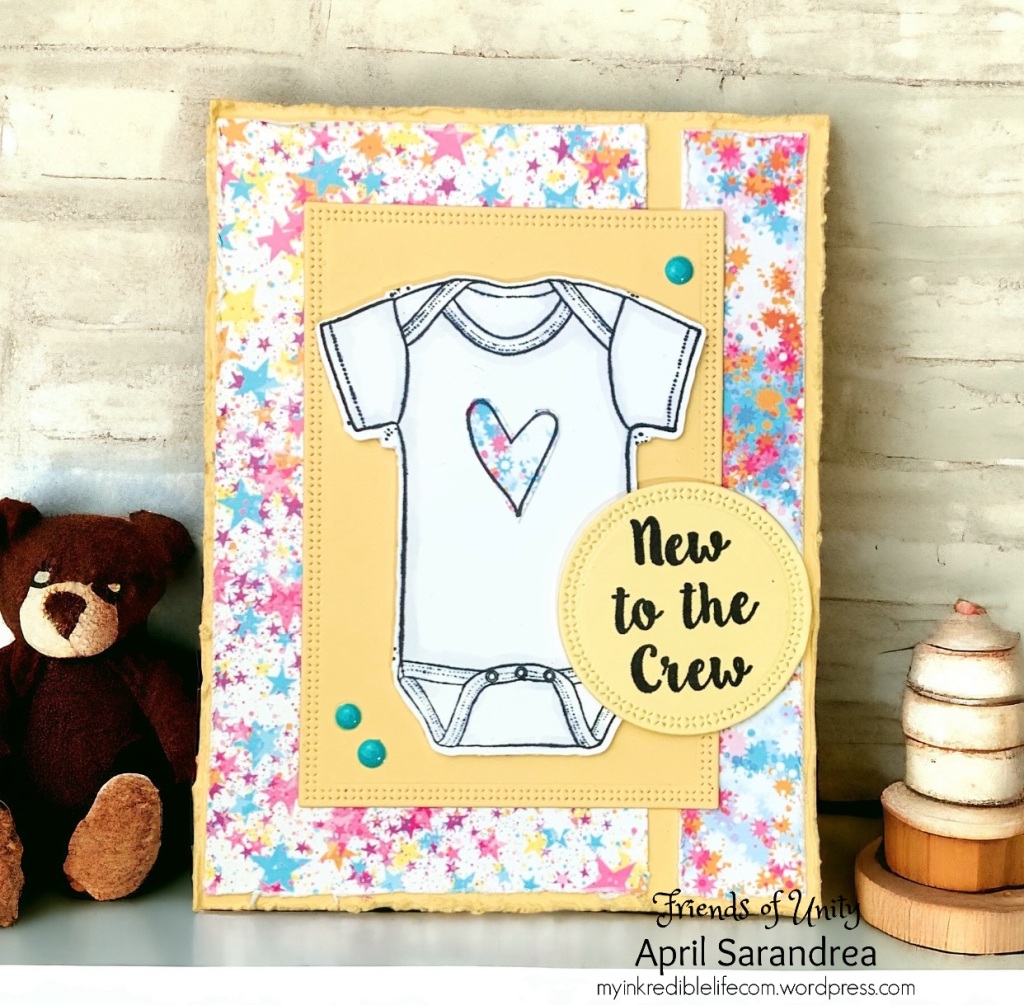
I struggled a bit at first coming up with some ideas for this month’s theme-but then I had an Aha! moment! What brings more giggles, laughter and smiles than the thought of welcoming a new baby! So I started my first card using the kit “New to the Crew”. The onsie in this kit is absolutely a must have and oh so cute!
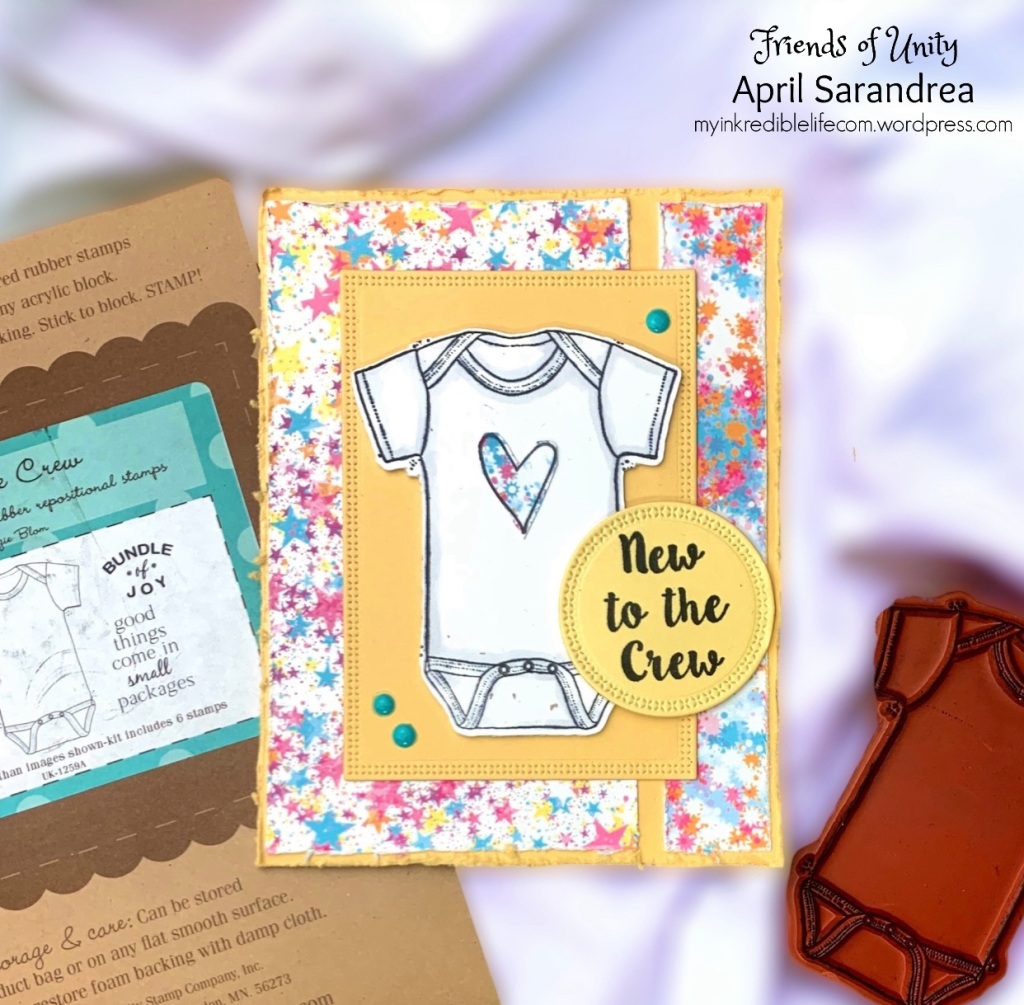
I wanted my card to be neutral in palette colors so I chose this beautiful double sided patterned paper and a yellow cardbase to achieve the look. I have also been obsessed with texture lately so I roughed up the cardbase and paper edges a bit. I used a rectangle stitched die to cut out a matte for the focal point and glued the piece to my card base (after adhering the paper of course)
The onesie was stamped onto white cardstock and cut out with my scan & cut machine. I used a very light gray alcohol marker to give it a bit of shading. Using a scrap piece of coordinating pattern paper I stamped the heart and glued it to my onesie. The onesie was attached to the card with foam tape for dimension.
I stamped the sentiment onto yellow cardstock and used a stitched circle die to cut it out. This also was attached to the card with foam tape.
I used a few Nuvo drops to add a bit of accent pieces to the card. Here’s a closer look:
And even closer:

This card , and new to the crew family addition, is sure to bring some smiles, giggles and laughter !
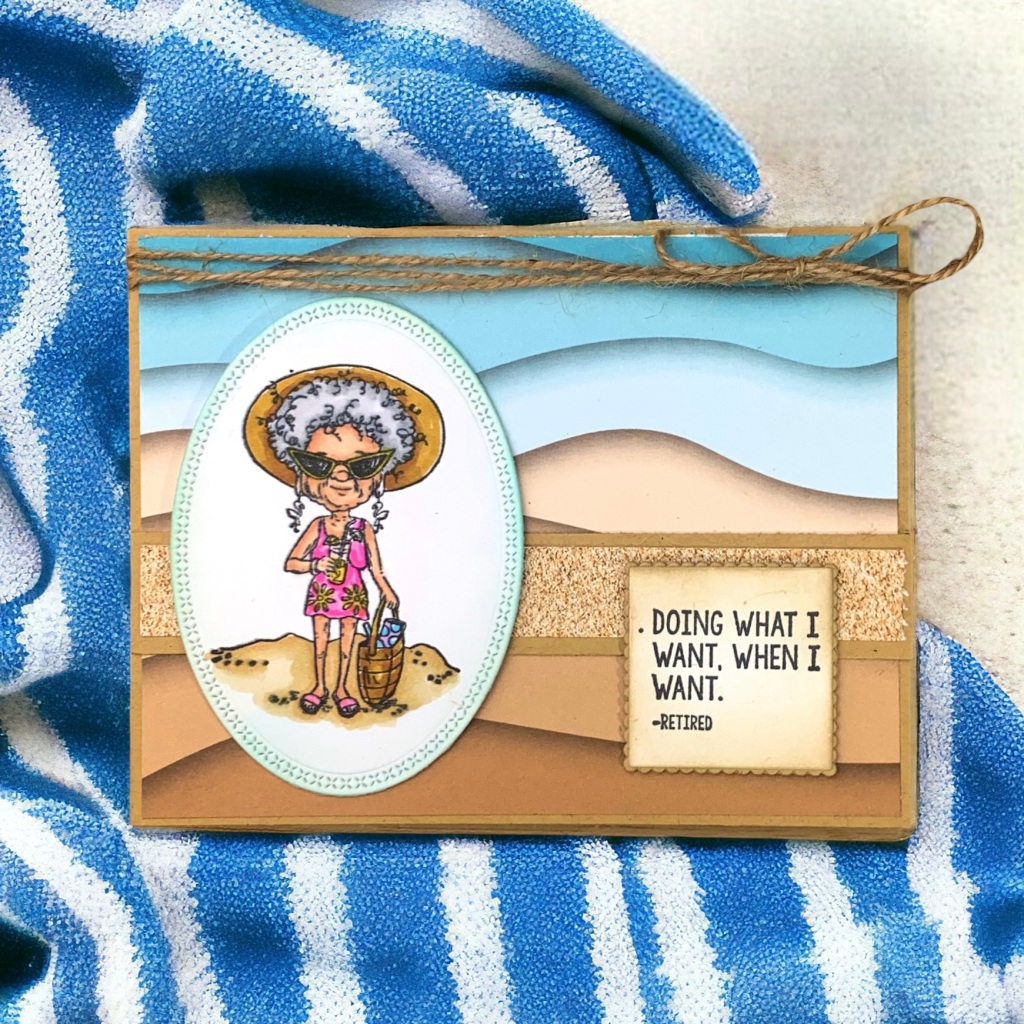
Next up, is a card I created that would certainly bring me a smile to receive- one for retirement! I have quite a few more years to go before these words will bring smiles, giggles and laughter in my life but we can certainly appreciate sending this card to someone who has earned it! And this lil old lady has the perfect mindset, doesn’t she? She comes from the kit called “Retired” and also has a companion in the kit with her which makes it perfect to use for anyone ready to say adios to the rat race of the working world!
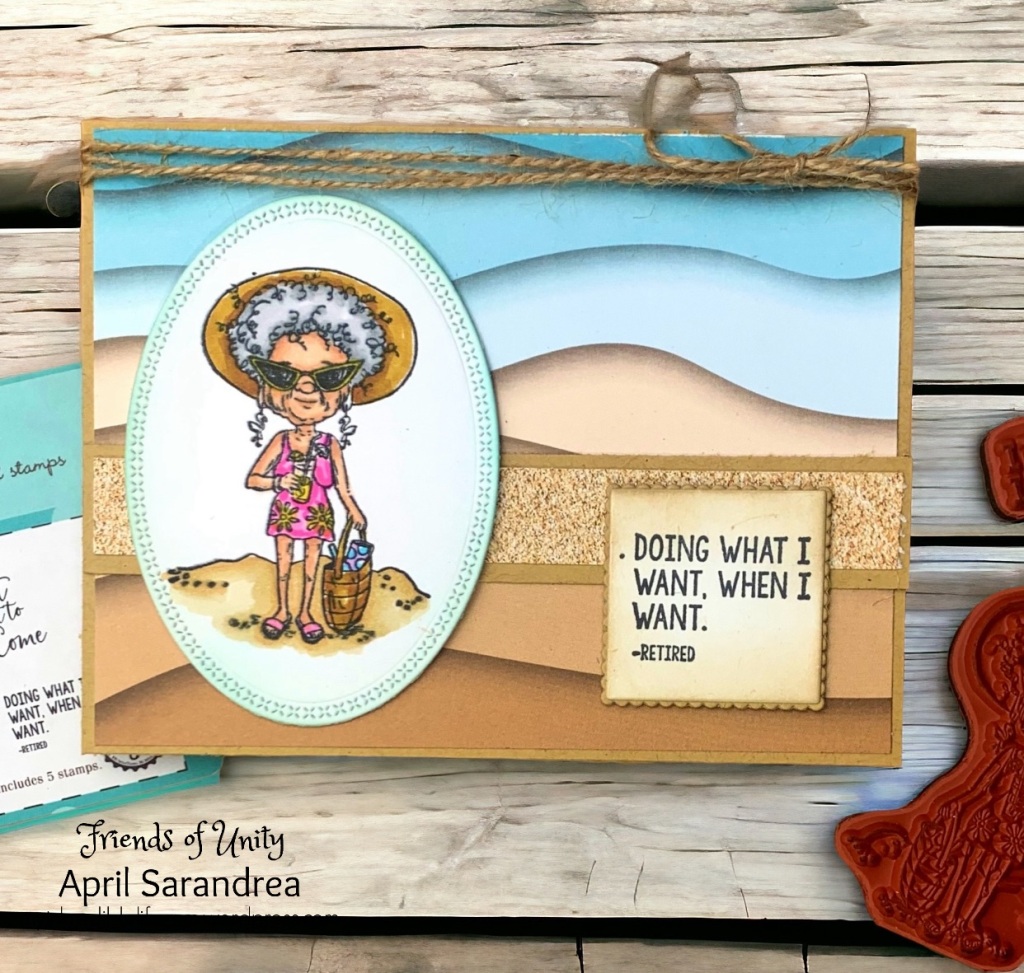
For this card I used a kraft colored cardstock base and pretty “beachy” pattern paper! This year I plan on using SO much of my pattern paper rather than hoarding it. I have plenty enough to last me until I am ready to retire that’s for sure!
I cut a strip of coordinating cardstock and sand themed pattern paper to adhere to the base (as shown) to break up the pattern just a bit. This paper pattern is gorgeous isn’t it?
I stamped our new retiree onto cardstock and cut out the image with a stitched oval die – one of my most underused dies in my collection. I do need to incorporate ovals a bit more into my projects. I brought her soul back to life from the job that sucked it out of her for decades using alcohol markers, brushed the edges with ink from Gina K and attached her to the card using foam tape.
The sentiment was also stamped onto white cardstock, brushed with ink from Gina G and cut out using coordinating square dies. This, too, was attached using foam tape for dimension.
To tie it all together (see what I did there? A lil punny humor) I wrapped some twine around for additional accent.
Here’s a closer look:
And a wee bit closer:

I surely can’t wait for the day I can do what I want, when I want! Our retirement destination is also to the beach but in Playa Del Carmen, Mexico. In the meantime, our new retiree can smile, giggle and laugh at me as I remain chained to my desk, marking off my calendar for the next 10yrs. Lucky gal she is!
For my final project I used two kits that coordinate perfectly! I used “Crappy Day” and “Just Stinkin’ Cute”. I thought this would be perfect to give to someone who is having “one of THOSE days” and I’m sure we can all relate! (Except for our newly retired gal. She’s living the dream now)
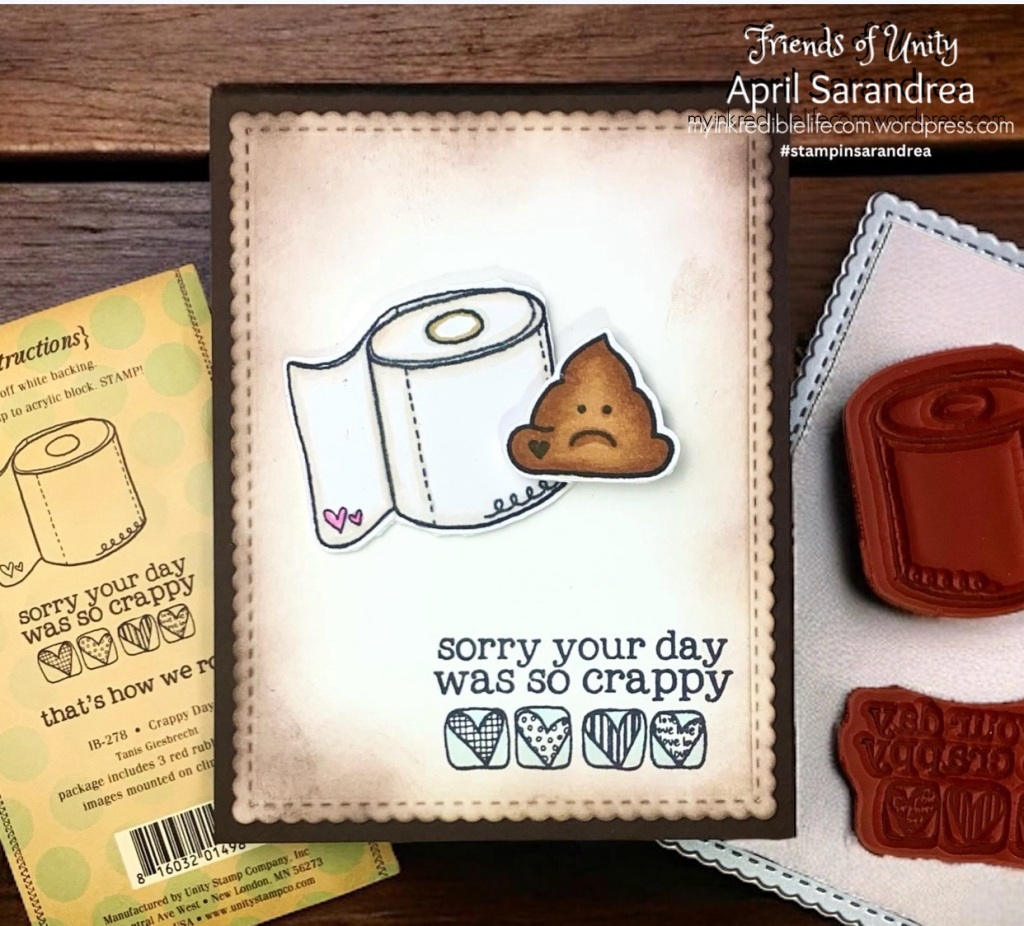
This card was so simple to put together! I started off with a chocolate brown cardstock base (fitting, eh?) and cut out a white base using a scalloped rectangle die. I inkblended the edges of the white base using Gina K ink and glued this to my brown base. I stamped the sentiment in the lower corner and only colored in the background of the hearts.
After stamping my toilet paper and poo, I colored them with alcohol markers and attached them using foam tape for some added dimension. I told my son to give this to his manager at work as I’m sure it will bring a smile and laughter to her day (or early retirement for him if she doesn’t have a sense of humor) But, hey!…it’s worth a shot at cheering up someone who’s having a crappy day! That’s my thought anyway.
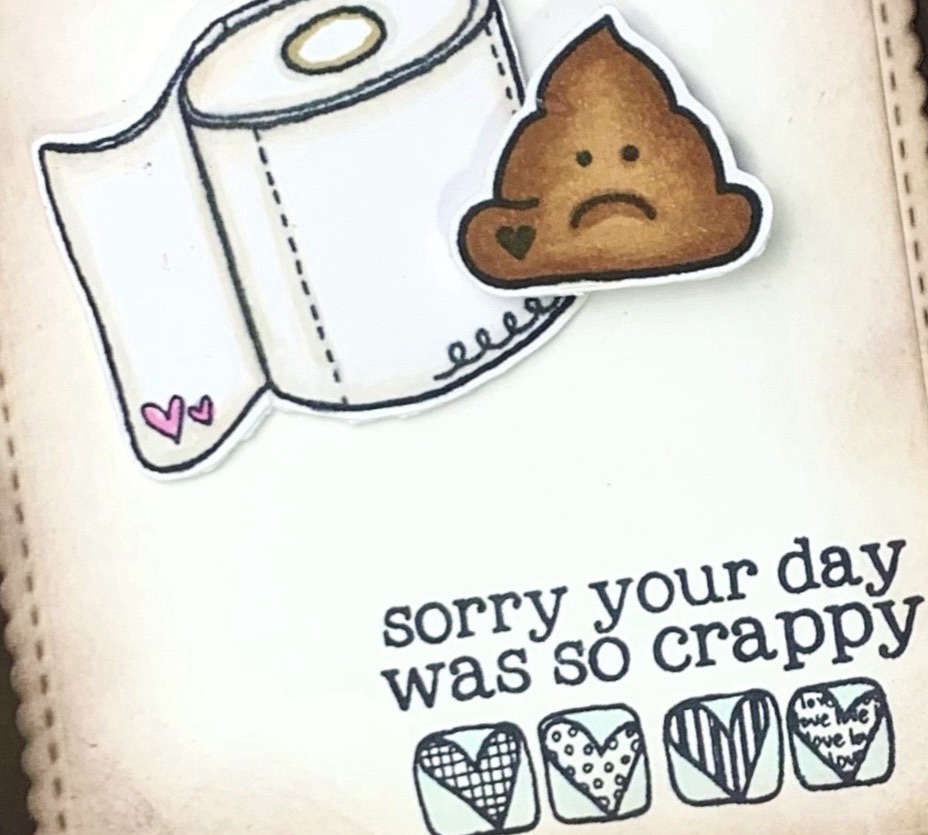
Here’s a closer look:

And a little closer- don’t worry, there’s no stink here!
Ha! I love it! I may make a few and keep them on hand at work myself! If you can’t laugh at crappy days, what can you do?
This concludes my share of smiles, laughter and giggles today! I hope you found a bit of INKspiration here. I’d love to know your favorite!
Before you go, if you aren’t already, be sure to follow me on Facebook at My INKredible Life and/or on Instagram ! Tag me with #stampinsarandrea if you were inspired to create a card using any of my ideas! I’d love to see!
Also, if inclined, I recently started a new Facebook page called Twigzandberries which focuses on my passion of holistic health, mindfulness and personal development. I’d love to inspire you some more there as well!
To start at the beginning of our hop, please head on over here to Crystal’s page :
To see what our next talented team member has in store for you, continue along here to see what Jane has to share!
Thank you for stopping by today! Have an INKredible month full of smiles, laughter and giggles!


You must be logged in to post a comment.